

Features
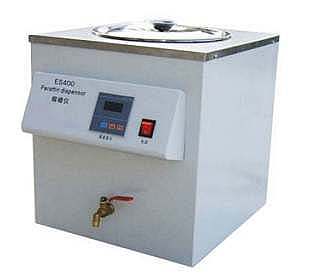
The grooved heating surface channels melted wax to a removable collection tray. The collection tray connects magnetically to the base of the main unit. Disposable plastic liners are included to insert into the collection tray for easy disposal of runoff wax. This unit now includes a digital control panel for personalized settings.
ASSEMBLY INSTRUCTIONS
. Remove the wax trimmer from its packaging and place it on a stable workstation. We recommend that you retain the carton and packaging.
* The wax trimmer comes with a detachable AC power cord. Connect the cord to the port located on the back of the unit. When ready to use, plug the cord into a power source.
• Attach the magnetic paraffin collection tray at the bottom of the unit and insert a plastic collection tray insert. The brim of the plastic liner can be folded down along the side of the tray that sits against the unit. The magnet will hold the collection tray in place.
• Flip the power switch to the ON position to begin use and adjust temperature. (See Operation section for instructions)
OPERATION – Reference the diagrams on the next page for best use.
• Plug in your wax trimmer and flip the Power Switch to the ON position. The digital display will illuminate and display the current temperature of the unit.
• Press the SET Key (bottom left button) to switch to the temperature setting mode. The setting will blink, and you can use the up and down Temperature Setting buttons (right side buttons) to set your desired temperature. To lock in your desired temperature, press the SET Key again and the unit will begin to heat to that temperature. The unit will remember this setting during next use until it is changed.
• The suggested operating temperature for this model is 80-90° C. The user may increase or decrease the temperature to make the paraffin melt faster or slower. This model should NOT be set higher than 100° C.


Reviews
There are no reviews yet.